Showing posts with label Homemaking. Show all posts

Thursday, July 12, 2012

Peppermint Laundry Detergent

IMG_6455

Ok so the prices of detergent are outrageous! Every time I need to buy some more I keep thinking that surely there needs to be a better way to do this! I DO NOT want to wash my clothes in detergent with a bunch of chemicals in it, but I also DO NOT want to spend a whole lot of money on detergent. ick. I would rather spend that money on fun stuff, like...an English toffee blended latte from The Village Bean. Ha! yum....you get the point. :) So I researched a few ways to make my own! I have been using this recipe for the last 6 months or so and it really seems to clean our clothes well. No there is not a lot of suds, but that doesn't mean clean. It seems to get some stains, but not all stains out. That is just like any detergent you would get at the store. If you want to get a tough stain out you would need to treat the spot with something else before washing it.

So here is the tutorial. It is easy, extremely cheap compared to ready-made store bought detergent, and it has no harmful chemicals in it!...plus it smells pretty good. :)

*hint: if you have a larger than 8 qt. pot you could double the recipe and make two gallons to save time! 

ingredients and materials:
-1 large stock pot, 8qt or larger
-grater
-funnel
-1 gallon milk jug/container
-1/3 bar of soap, grated
-1/2 cup borax
-1/2 cup washing soda
-8-10 drops of 100% therapeutic grade peppermint essential oil (optional)

After you have gathered your ingredients and materials you can start by grating the bar of soap into your pot. Grate about 1/3 of the bar and then put the rest of it aside to use for the next batch or your next shower. :)

IMG_6462

Sorry I realize that picture was not the best...oops, but you get the point. After your done grating, pour 1/2 a gallon of water into the pot and cook until the soap is dissolved. Then add the borax and washing soda. Stir and bring to a boil.

IMG_6464

After it comes to a boil, take it off the heat and add a 1/2 gallon of cold water and let it cool. You do not want to pour boiling hot water into a plastic jug. :) After it cools add your drops of essential oil if you like. Any scent will do, but make sure it is 100% pure therapeutic grade essential oil. I used Peppermint! It's fresh and neutral. Lavender is nice too, but my hubby prefers to not smell like flowers. I used 8 drops and it really did not make a very strong smell, just a hint is all I wanted.

IMG_6470

Then use your funnel to assist in pouring your detergent into your jug or container.

IMG_6468

...and there you have your homemade laundry detergent! It will thicken over the next 24 hours. I use about 1/2 cup detergent per load; less or more depending on your load size. I need to do the math still and find out how much you would be saving per load and compare it to your average store-bought detergent. So I will update this post in the near future. I hope you enjoy it as much as we do!

IMG_6479

Thursday, February 2, 2012

Mason Jar Salads

<span class=

For the last couple of weeks I have made Sunday my prep day. After getting back from the grocery store I wash and prepare all my lettuces and veggies so they are ready to eat. We never have anything go bad if they are ready and available to eat with out the lazy," I really just want a snack, but don't feel like washing and chopping..etc. etc." We eat much healthier when things are prepared and I am most likely going to make sure I eat my large salad for the day. Mason Jars! I love them! They have kept my lettuce and veggies crisp and fresh all week long. The last two weeks we made actual salads in the jars that looked something like this...

(from bottom to top: tuna, cherry tomatoes, celery, carrots, red peppers, pea sprouts, green leaf lettuce)
<span class=

These were great to have on hand. I already had a healthy lunch prepared so there was no excuse to eat anything else. Also I could pour it into a bowl with one hand while holding a baby in the other! Love it! I used 12 oz. wide mouth jars because that is what we had on hand, but they were not very large salads. These are especially good for those who work or need to pack a lunch everyday. Just grab it in the morning and go!, but since we always eat lunch at home we decided to separately prepare our veggies so that they are ready to just toss into a quick salad. This has been a life changer!!! That may seem dramatic, but no really it has been a life changer. I have felt so good getting a quick and easy and rather large amazingly healthy salad into my lunch everyday!

I got home from the grocery store on Sunday and washed and and prepared my lettuce and stuck it into a Ziploc bag to keep in the fridge. Then I washed and chopped my veggies...this week I had celery, red peppers, carrots, and green onion. I also shredded up some turkey deli meat to top my salads. I love preparing it this way. I had veggies on had to whip up a quick omelet in the morning (with peppers and green onion), for sauteing and roasting; they were already chopped! It seriously has made life that much easier for this season of life when dinner cooking time turns into to crazy "mama, I need this, I need that" time. :)

I also have been learning alot about grains; when they were introduced into our diet, and realize that they really are not necessary...and besides I have no self-control with them sometimes. This week I ate strictly Paleo. I can tell you right now that I have felt amazing the last few days. Lots of energy, my workouts are awesome, but I probably won't keep it up. Maybe I need to work harder with it and figure out how to fit it into my life easier and on a more pocket-friendly budget. Meat is so expensive!...and I want to eat good clean meat. hummm...well anyway, I don't have to go 100%, but keep it as something to strive toward; in moderation with the not so digestible. :) Having veggies on hand has been key so I don't stray or even think twice about other lunch/snack possibilites.

Here are some websites I was inspired by for these mason jar salads. People actually prepare whole meals in them too!


Tuesday, March 15, 2011

the seeds are started

The seeds are started... here we come spring!

Seed starting

Sunday, August 8, 2010

Now reading...

library books

A new library branch opened in Davenport and it is so awesome! It is bursting with tons of amazing new books that I just could not walk by with out picking up. So naturally I overwhelm myself by checking out a huge stack of books and hope to get them read by the time they are due back. Not to mention I have a few other books I am thumbing through at home as well. Most likely they will have to be renewed at least once. :) Well anyways, here is the list from top to bottom...

So far this book has had some good advice on eliminated tantrums. I have heard lots of good stuff about this book from a few friends who have read it so I am really looking forward to digging into it more.

Mrs. Meyers Clean Home by Thelma Meyer
Lots of awesome advice on cleaning from the heart of Mrs. Meyer herself. She is a Mom of 9 and now grandma as well and from Des Moines. She is witty and wise explaining in simple detail how and when to clean and organize just about anything in your home...also with what products as well.

Softies Only a Mother Could Love by Jess Redman and Meg Leder
...fun loving little critters to sew.

The Kind Diet by Alicia Silverstone
I actually read this one first and I am pretty much done with it now. I have had this book on hold for a while now so I was super anxious to dig into it. It was full of awesome recipes some of which I will be sharing with you guys at some point. I also enjoyed reading about her experience with food and trying different diets such as vegan, raw foods, etc. and how she found that macrobiotics and listening to her body was key.

Has over 250 immune-boosting foods and recipes that are appealing to the kiddos. Lots of colorful pictures and faces. That is my favorite part about food/cookbooks; I am definitely drawn to the pictures first. :)

Stitching, baking, nature, art and the comforts of home...this book just looked like it was full of coolness so I snatched it.

Sock and Glove by Miyako Kanamori
This book is sooo cute! It shows step for step how to make several little softie friends out of old socks and gloves. I have always wanted to make Will a real homemade sock monkey. Hopefully I get around to it. :)

Apartment Therapy Design Solutions by Maxwell Gillingham-Ryan
I most likely will just look at all the pictures in this book rather then really reading it. In fact I have already thumbed through it a couple of times. It is a very large book full of awesome designed apartments. I often go to apartment therapy.com for lots of inspiration so I was super excited to see this book at the library.

Saturday, July 10, 2010

Vacation Part 1-Living History Farms

My creation
Hello! We have been out of town vacationing for the last couple of weeks. We were in Des Moines visiting family and friends and then traveled to Cleveland, Ohio for a small family reunion. I took so many pictures!!!...but the funny thing was that after downloading them all and looking at them I realized I was never in a single one! Ha...I guess that's what happens when I am the only one taking pictures. I decided to split up the trip in a few parts to share this week. It was so much fun to spend quality time with friends and family and sunshine and adventure. One of our first days we visited Living History Farms in Des Moines. Seeing and learning about the way Americans lived in the 1700's, 1800's and 1900's. So much simplicity and quietness where everything is handmade. Will enjoyed the tractor rides and the animals the best. You can see the rest of the pictures by clicking here.

Thursday, March 11, 2010

Recent Dinner Favs

Quinoa with spinach and snow peas


1) Quinoa with Spinach and Snow Peas (as shown above: we probably have quinoa twice a week, usually for lunch, and spice it up for dinner sometimes, but this is our simple recipe that we eat a lot)

-1 cup quinoa
-2 cups filtered water (or veggie stock)
-sea salt to taste
-a good handful of fresh spinach, cut up in small pieces
-3/4 cup snow peas, chopped
( We usually change it up and use whatever kind of veggies we have on hand: broccoli, carrots, etc.)
*Put quinoa and water in saucepan along with a dash of salt. Bring to a boil and turn down to simmer until fluffy; about 10 minutes. In the mean time steam peas (or other veggies). When quinoa is done stir in chopped spinach and top with peas and a little salt to taste.

2) Salmon- Veggie Bake (from an old Better Homes and Garden Cookbook. We have had this a couple times in the past month. I am NOT a seafood person, but I learned to really enjoy this meal... the citrus taste makes it so yummy. )- recipe serves 4.

-1 lb. fresh wild caught salmon
-2 cups thinly sliced carrots
-2 cups mushrooms
-1/2 cup sliced green onions
-2 teaspoons finely shredded orange peel
-2 teaspoons snipped fresh oregano or 1/2 teaspoon dried oregano, crushed
-4 cloves garlic, halved
-1/4 teaspoon salt
-1/4 teaspoon black pepper
-olive oil for drizzling
- orange slices for garnish

*Rinse salmon: pat dry and cut into 4 serving sizes. (we did half the whole recipe...so for us I did 2 servings.) Set aside. In small saucepan cook carrots, covered, in a small amount of boiling water for 2 minutes. Drain and set aside. In large bowl combine carrots, mushrooms, green onions, orange peel, oregano, garlic, salt and pepper. Toss to combine. Tear off individual pieces of tin foil. Divide veggie mixture among the 4 pieces of foil. Place a salmon fillet on top of each pile of veggies and drizzle with a little bit of olive oil and garnish with a couple slices of orange if desired. Bring together 2 opposite edges of foil and seal with a double fold. Fold remaining ends to completely enclose the food, allowing space for steam to build. Place the foil packets on a baking pan. Bake at 350 degrees for about 30 minutes. Open slowly to allow steam to escape and transfer packets to individual plates.

3) Lentil and Noodle Soup ( Will especially loved this one!)

-3 1/2 cups water
-1/2 cup small pasta noodles (we used a whole grain elbow mac)
-1/4 cup dry lentils
-1 Tbsp. dried minced onion
-1 tbsp. chicken bouillon granules
-1 teaspoon dried parsley
-1/2 teaspoon dried oregano
-dash of garlic powder
-whatever veggies you have on hand, chopped small (we usually do carrots and peas)

*Combine all ingredients in 2-qt. saucepan; bring to boil over medium heat. Reduce heat; cover and simmer for 25-30 minutes or until pasta, lentils and veggies are tender. serves 4.


Thursday, February 4, 2010

Banana Oatmeal Cookies


No Sweeteners...No Butter...No Eggs...No Wheat! Ahhh! What are in these cookies?!?! I was amazed with how these turned out! They are actually really yummy for not having any ingredients a normal cookie would have. I found the recipe from Peggy's Kitchen where I find tons of unique and hearty recipes. Here it is...

2 cups rolled oats
2/3 cup raw almonds
1 tsp. baking powder
1/4 tsp. sea salt
1/2 tsp. ground cinnamon
1/4 tsp. ground nutmeg
1 1/2 cups mashed banana (about 3 bananas)
1/4 cup oil
1 tsp. pure vanilla extract
3/4 cup raisins

Preheat oven to 350 degrees. Lightly oil a cookie sheet. Grind oats and almonds to a coarse powder in food processor or blender. Pour them into a large mixing bowl. Stir in baking powder, salt, cinnamon, and nutmeg. In separate bowl or in food processor, beat together bananas, oil, and vanilla until smooth and creamy. Add banana mixture and raisins to oat mixture. Mix well. Drop cookie dough in Tbsp. on prepared baking sheet. Bake 13-16 minutes or until bottoms are golden brown. Makes 3 dozen.

*for a variation you could add carob or chocolate chips.

Sunday, January 24, 2010

Oat Muffins with Pear and Pecans

Oat Muffins with Pear and Pecans
2 Tbsp. unsalted butter
1 cup quick oats
3/4 cup chopped pecans
1 cup unbleached all-purpose flour
1 1/2 teaspoons baking powder
1/2 teaspoon baking soda
1/4 teaspoon salt 3/4 cup butter milk
1/3 cup brown sugar
1 egg
4 canned pear halves, drained and chopped

topping-
1 Tbsp. old fashioned rolled oats
1 Tbsp. pumpkin seeds
1 Tbsp. sunflower seeds
1 Tbsp.brown sugar

Preheat oven to 400 degrees. Grease 12 cup muffin tin. Heat butter in small pan over medium heat until nut brown, 2 min.- set aside to cool. Toast oats and pecans in dry skillet over med. heat, stirring until fragrant, 2 min.- cool, transfer to bowl. Add flour, baking powder, baking soda and salt. Combine buttermilk, sugar and egg and mix all together. Add butter. mix in pears, spoon batter to pan. Combine the topping and pour over muffins. Bake 22 minutes or until done. Cool for 5 minutes and remove.

I made these muffins a few weeks ago and thought I would share them with you all. It was a fun change up from the usual breakfast (we don't do this too often, but it was a nice treat); unique and nutrient packed. :) Thad really liked them...for each muffin has 6 grams protein and 2 grams fiber. It was easy for him to grab a couple on the way out the door in the morning.

Thursday, December 10, 2009

Creative Christmas Day 5- Yummies!

Row 1:Wheat-free- egg-free cookie cutter cookies, Pumpkin Bread with no sugar

One of my very favorite parts in celebrating the holidays are all the handmade goodies. These are some recipes I have collected to share with you. I have only made the almond butter balls myself so far. I make those many times though out the year, they are so simple! I may not get to all of these recipes this year but I definitely plan on making the peppermint log and the Italian Chard stuffing. Those look super yummy and unique. I also came across some yummy ham glazes that might be interesting to get creative with this year for those of you who have the traditional ham meal. Now I just made myself Hungary.
Have a splendid afternoon!

Monday, December 7, 2009

Creative Christmas Day 2-Tradition


hats and mittens advent calendar by garnet hill

A native Mexican plant, poinsettias were named after Joel R. Poinsett, U.S. ambassador to Mexico who brought the plant to America in 1828. Poinsettias were likely used by Mexican Franciscans in their 17th century Christmas celebrations. One legend has it that a young Mexican boy, on his way to visit the village Nativity scene, realized he had no gift for the Christ child. He gathered pretty green branches from along the road and brought them to the church. Though the other children mocked him, when the leaves were laid at the manger, a beautiful star-shaped flower appeared on each branch. The bright red petals, often mistaken for flowers, are actually the upper leaves of the plant.

Tradition! I love it...Each family and culture has their own traditions each year for celebrating Christmas. I came across this idea of an advent calendar ( I can't remember where I heard of it, but it was not my idea so I can not take the credit). Instead of the traditional advent calendar this one has a little twist. Placed inside each pocket is a piece of paper with something to do that night as a family. I came up with a list of 25 ideas that could be incorporated into the advent calendar, or just used as an individual new tradition. Some of them are probably already traditions in your family, but especially for kids there is so much excitement waking up in themorning to open up the next pocket on the calendar to see how they will be celebrating that evening.

1-put up the Christmas tree and decorate!
2-make ornaments.
3-drink apple cider and listen to Christmas music.
4-play a board game
5-feed the homeless at a local shelter.
6-make festive garland.
7-go ice skating
8-make a table centerpiece
9-make Christmas cards.
10-donate extra clothing to a shelter
11-go caroling.
12-make a button wreath
14-watch a Christmas movie.
15-invite friends over for a holiday dinner
16-make paper snowflakes
17-shop for family angel tree.
18-bake cookies.
19-deliver cookies.
20-look through old holiday photos while sipping hot chocolate.
21-look at Christmas lights.
22-wrap gifts.
23-read the Christmas Story.
24-go to church.
25-go around the table and share why each person in the family is a gift to you.

What traditions does your family do to celebrate Christmas?Have a lovely day.

Sunday, December 6, 2009

Creative Christmas Day 1- Decorate!

For most celebrations the first thing we need to do is DECORATE! Making my home feel warm and cozy and festive is a must! I was telling my husband the other day that I love the feeling when I walk into our warm cozy house during this season with the tree all lit up. It makes me so excited to be home with my family. Of course there is the traditional Christmas tree (which we put up each year)..but just for fun as you can see above are a few crazy alternatives to the traditional Christmas tree that I found at apartment theropy. Maybe one of these years I will get brave enough. :)

Below are a few simple tutorials of decorative projects I would like to try at some point whether that be this year or next. I just didn't want to forget about them, and thought maybe one of you would want to give them a try.

1- ice wreath by resurrection fern...we need to have a snow with freezing weather first.(but thats ok, I could hold off on this one until next year)... :)

2-beeswax candles... I may even do these after the holidays if I don't get around to it before. They look super easy.

3-Sweater Stocking by lifeingrace on blissfullydomestic.

And of course a few etsy finds below that I could not pass up sharing...

cute birdie ornaments -by sugarelf

tree centerpieces from vintage trims- by thelittleprints (she may have already sold this one!)

festive felt garland-by me! :)
Have a splendid Sunday!

Sunday, September 13, 2009

Salsa Canning


There is nothing better than fresh summer taste in the middle of winter. I have always wanted to try canning, but always thought it looked so complicated. I read up on it a little bit and realized that it actually seemed pretty simple! So I got a whole bunch of fresh locally grown goodies at the farmers market and found a good recipe. I spent a few hours last night making this black bean and corn salsa that I found in Seasons magazine.(In this recipe you may need to adjust the acidity. I used lemon juice.) I thought I would only make a small batch for my first time to make sure I did everything right since I am usually not a very precise cooker. I always seem to change the recipe a bit...but with canning safety I had to make no mistakes. :) I do not have a pressure canner, I just used the large pot boiling method and it seemed to turn out great! I might do it again later this fall and make some applesauce. yum!

Wednesday, July 29, 2009

The Ceremony of Baking Bread


There is something special about baking your own bread. mixing it. kneading it. shaping it. watching it. baking it. slicing it. eating it. It is quite the process. Maybe it is the smell or the taste, or the science of it with how magically it rises from such basic ingredients...or perhaps it is ritual. For so many years bread has been a staple food; one of the oldest prepared foods. Women have slaved over baking their own homemade bread for their families for years. I was reading recently about two women in today's society that got together each week alternating houses to bake bread for their family for the week. This is a beautiful part of community that was talking about in an earlier post.

I was intrigued by the thought of baking bread as a ceremony after reading "The Organic Living Book," by Kohn. (didn't catch the first name, I already brought it back to the library) In many cultures bread has significance beyond its nutrition. The simplest kind of bread is a mixture of flour and water that has been baked. This is known as "the matzoh," or unleavened bread that was made by the Hebrews of the Bible when they fled to Egypt. Bread is now a metaphor for basic necessities. "Bread" as an expression for money or "to earn one's bread" for earning livelihood. "To break bread" is to indicate the sharing of any kind of food, or in the remembrance of Jesus patterned after the last supper. Bread is basic. Essential. Symbolic. Natural.

Here is the simple whole wheat bread recipe that I used yesterday; perfect for starters and made with all natural ingredients. It really is like a ceremony...after all that hard work of making, the result is a feast! It tastes so much better knowing that you made it yourself. Thad walked in the house with a big smile because of the wonderful aroma. That is part of the ceremony too. :)

Simple Whole Wheat Bread -makes 2 loaves
-two packages of dry baking yeast
-lukewarm water
-1 Tbsp. sea salt
-1/4 c. pure safflower oil (or you could use melted butter)
-1/4 c. pure honey
-8 cups of stone-ground whole wheat flour
-1 egg
-a large mixing bowl, 2 bread pans, measuring cup and spoons, small bowl, and a towel.

1. Pour 2 packages of dry yeast into a small bowl, add 1 cup of lukewarm water. Stir and leave it for a few minutes to dissolve.

2. In large mixing bowl combine 2 1/2 cups of lukewarm water, 1 Tbsp. sea salt, 1/4 cup oil (or butter), 1/4 cup of honey, 8 cups of flour, and 1 egg.

3. Add yeast mixture and stir dough with wooden spoon until it is too hard to mix.

4.Kneading- sprinkle some flour on a large clean surface and on your hands. Flatten dough with palms enough so you can fold it in half. Press down hard on the folded dough a few times until flat and repeat. From time to time turn the dough around and flour your hands when necessary. Knead for 5-10 minutes until less sticky, firm, smooth and elastic.

5. Without washing the large bowl rub the inside with oil or butter. Form the dough into a ball and put in the bowl. Rub the top of the dough with a little oil so it does not form a hard crust. Cover the top of the bowl with a towel and set in a warm place (sunny window) until dough has risen about twice its size. This will probably take about 1 hour.

6. Punch it! That's right...make a fist and punch it! Maybe a couple times if you need to until it is punctured like a balloon. Knead dough for a few more minutes and divide into two equal parts.

7. Fold each part over a couple of times and form into the shape of a loaf. Slap it hard to break any big bubbles inside.

8. Put each loaf into a greased loaf pan and shape it until it looks how you want. For a softer crust brush oil over the top of the dough, and for a crunchy crust dip your fingers in cold water and rub over top of loaves.

9. Cover pans with a towel and let dough rise once more until doubled. About 30-40 minutes.

10. Heat oven to 350 degrees, put in bread and bake for 50 minutes.

11. Remove bread from pans immediately and let cool for a while.

12. When bread is cool you may wrap it and freeze if making multiple loaves or share with a friend.

Yummy! The aroma is amazing and stays in the house all day!...and then slicing it is a part of the ceremony as well. So is eating it! enjoy!

Sunday, July 12, 2009

Local Freshness!


My favorite part of the weekend is the farmers market. Look at these pictures!...so much color! They really look this good in person...and even better, they taste as good as they look! :)
There is just something about cooking/preparing food that you either grew yourself or know who grew it. Over the past 4 years or so I have developed a huge love for buying food locally. When putting something in my body it is a big deal where the food came from and how it was treated when grown. When I buy from the market I am able to talk to the actual person who grew this produce. It's kinda neat when you think about it.


Over at Heather Jane's blog she is doing a Go Local 2009 challenge: preparing at least one meal a week with fully local ingredients. You can check out the details here. Below is my lunch; just your basic strawberry salad with a couple different kinds of lettuce, tomatoes, cucumber, sunflower seeds, and strawberries. You can see how red and juicy those strawberries are in the center as opposed to your store bought berries that have a little white. Oh boy, I sure am going to miss it when berry season is over, they are my absolute favorite! Ask any of my friends from growing up...they sometimes would buy me a package of strawberries for my birthday. :)


Thursday, April 9, 2009

Spring Spring


I have been looking at a bunch of wonderful ideas that have to do with spring because I am so excited that it is finally here! Some days in the midwest it still does not feel like spring, but the sun has been shining this week and Easter is this weekend and it gets me in the mood. Below are a bunch of links to great websites, projects or etsy finds that have to do with spring. I did not want to forget these for future reference...so it is always good to blog and mark them down so I can find them again someday.

If you are growing anything you probably have these started already, but I thought this was a great tutorial that I wanted to remember.

 baby hat and  flower stacker toy....super cute for the kiddos.

Here is a great tutorial on how to Make your own kite.

   
...and we all know there will be spring cleaning going on at some point. Here is a spring cleaning guide, and a great idea for storing all the STUFF we have...
Also click here for yummy stuff...so cute! 

Happy Spring! We are off to Stillwater to see family...have a good Easter!

love-

Friday, March 20, 2009

Positive Homemaking

There was an article in Family Circle Magazine that Nancie Carmody wrote about being positive and thankful. She wrote about how she was thankful that the alarm clock went off "because it means I'm alive!" and when her clothes fit snugly "because it means i have enough to eat" and when there was cooking, cleaning, and fixing "because it means I have a home" and when she was exhausted at the end of the day "...because it means I have been productive."

After reading this I realized that I have more blessings than I think, but sometimes I have tochose to be grateful in life's challenges. I am going to try to keep this in mind this week and see how much more exciting life can get! I am going to practice gratitude, learn to be content, laugh a lot, put away my negative thoughts, and adjust my focus on what the apostle Paul says...
"Whatever is true, whatever is noble, whatever is right, whatever is pure, whatever is lovely, whatever is admirable-if anything is excellent or praiseworthy-think about such things."

Each day next week I will be posting something about gratitude and a positive attitude. I feel if I continue this for a few days it will more likely become a bigger part of my life. So those that want to join me should visit me back here next week. I would love to hear what you are thankful for, what has been a blessing in your life, and how you have learned to be content.

For starters here is a list of 12 things I love about homemaking and being a mommy...

1. I can lay down and snuggle and giggle with Will anytime I want.
2. Yummy smells in the kitchen.
3. I get to keep learning how to make my home a special place...slowly decorating each room to     make them come alive.
4. Watering and watching my plants grow.
5. I get to wear my sweats as long as I want.
6. The humm of my sewing machine and that I get to make things with beautiful fabrics.
7. The warmth of the clothes when they get out of the dryer.
8. The smell of a freshly bathed baby.
9. The excitement of trying a new recipe and chopping colorful veggies.
10. Capturing everything during the day with my camera.
11. I can take full advantages of the seasons-getting outside during the day or enjoying a view         from the window.
12.I like serving for the Lord, and He called me to do this.

Have a lovely weekend, hope to hear from you next week.

Saturday, March 7, 2009

Wheatgrass


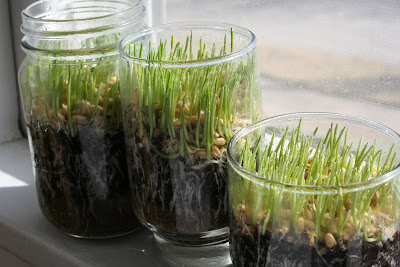
It was actually pretty nice a couple days this week, but I know not to fool myself...it always seems to get cold again this time of year. I decided I needed a little bit more green in our house and i found this great idea from mom in madison. Wheatgrass!...it sprouts and grows so fast its a lot of fun to watch. I literally woke up every morning this week and went straight downstairs to look how much it has changed.
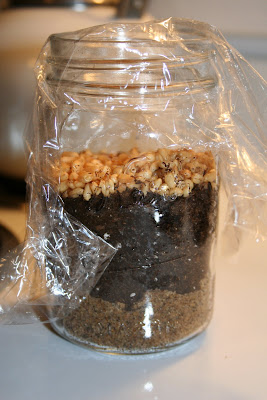
It is so easy to do, and I chose to do it in glass so i can watch the growth process. All you need is a little sand, potting soil, wheat berries(i found organic from our farmers market),plastic wrap and a container to plant in.

First soak the wheat berries in room temperature water for 8-12 hours-drain and change the water about half way through. Then fill the bottom of your pot/jar with one inch of sand.(this is to keep it from getting waterlogged) Then put about 2 inches of potting soil layered over the sand, and then top it with a thick layer of wheat berries. I think I may have put too thick of a layer-as the grass has grown and it has been pretty crammed, and too thick of a layer makes it easier for mold to grow....so just enough to cover the soil. Water lightly and then cover loosly with plastic wrap and place it in a shady spot. 
march 2
Spray with water morning and night. Berries should sprout after the first day; after sprouted you may remove the plastic wrap and keep it in a window to get light. In a few days you should have grass! Continue to spray with water every morning and night. Once the grass is growing you may want to rinse it out everyday to prevent the lower berries from molding.(fill the jar with cool water then use a finger to drain.)
It is so much fun once the grass starts growing, it can grow like an inch or more a day! You can trim it when it reaches 4 inches or so...this makes for some green in the house during these long winter months...you could also snip it and add it to smoothies, or if you have a grinder some people grind it and take shots of it...I don't know enough about that, but my step mother does that. Just beware of the overwhelming scent it gives off when snipped. :)
march 4
march 5

march 6

march 7
Its always nice to have a little more green life in the house when its cold outside. :) Have a good weekend.

Thursday, March 5, 2009

The Recipe Box Swap


I finally decided to participate in the recipe box swap over at Randi's blog. She has been doing it for months now, and whenever the first thursday of the month rolls around I always forget about it. So here it is...

Sweet Citrus Celery
I think I actually found this recipe on one of those free recipe cards you can find at the grocery store.


4 cups sliced celery
1 cup chopped red bell pepper
1 cup green onions, chopped
1 tbsp. grated fresh gingerroot
1/2 cup orange juice
1 tsp. cornstarch
1 tbsp. light brown sugar
2 cups cooked long-grain brown rice

***Drizzle a large skillet with extra virgin olive oil. Add celery, pepper, greenonions, and gingerroot. Cook about 5 minutes or until celery is crisp tender. In a small bowl combine orange juice and cornstarch; add to vegetables along with brown sugar. Cook until mixture thickens and boils. Cook and stir 1 minute more. Serve over rice. Serves 4
Enjoy!

Wednesday, March 4, 2009

Big Day!


Today Will is 5 months old!! Wahoo!...I can hardly believe how fast he is growing...and he is getting quite the little personality. :)


We got a new aloe plant...exciting...exciting!

...and in the studio I have been overwhelmed with so many ideas. I made lots of small baby blankets "Linkys,"(with hopes to sell). They have a super soft backside and a link in the corner so it doesn't fall out of the carseat or stroller.
Here they are all rolled up. I had so much fun using these modern designer fabrics I ordered from the fabric shoppe
..and my new favorite spring bag!! My mom gave me some new fat quarters she found on sale and these bright floral patterns seemed perfect for a new big bag to carry all the baby stuff I have to carry around now. I don't like to follow patterns; I just figured it out as I went...so there are lots of mistakes. I will be making lots more to figure out exactly how I want it to look.


Have a splendid day,


Related Posts Plugin for WordPress, Blogger...